How to Cloak Affiliate Links (& Why You Should)
I always run my affiliate links through redirects – also referred to as cloaking affiliate links – for several reasons:
- Running them through my redirects means I have a click count to match up to the one the merchant is reporting.
- Affiliate links are usually ugly and impossible to remember without doing a copy/paste. Redirects allow you to create short, memorable URLS for them and allow you to access commonly used affiliate links from memory.
- If you’re in an industry where you market to other affiliates, it can help prevent folks from switching out your affiliate ID with theirs.
- If the merchant decides to change networks or linking methods, you can edit a single redirect instead of needing to edit every instance in which you linked to them throughout your entire site.
- If you decide to change which merchant you’re using to promote a product, you can edit one redirect instead of needing to edit every instance in which you linked to them throughout your entire site.
- If a handful of the merchants I mention on a regular basis don’t have affiliate programs, I’ll often still cloak the link to their main website. This way, if they ever do launch an affiliate program, I can affiliate all my previous links to them by updating the one cloaked link.
- If you’re running an affiliate datafeed site, anything you can do to make your site more technically unique than the other 4000 affiliates using the same datafeed is a bonus in regards to affiliate datafeed SEO.
What does it mean to cloak affiliate links?
Cloaking an affiliate link just means that you are creating URLs on your website that redirect to an affiliate link. For example:
This is my affiliate link for Optin Monster without cloaking it: http://www.shareasale.com/r.cfm?b=601672&u=313242&m=49337&urllink=&afftrack=
This is my affiliate link for Optin Monster after cloaking it: https://sugarrae.com/getit/optinmonster
Both links go to the same place, and both links will track my affiliate cookies correctly.
How to create cloaked affiliate links
You don’t have to use a plugin to create cloaked affiliate links. You can do so with this method detailed out by Yoast or by using your .htaccess file.
However, you should never touch your .htaccess file unless you’re well versed in using it because making an error within it could take down your whole site. Using .htaccess or the Yoast method for manually cloaking affiliate links means that you lose out on the additional features a link cloaking plugin can provide.
There are several affiliate link cloaking plugins on the market, but I use the Pretty Link Pro WordPress plugin to cloak my affiliate links.
(Disclosure: I came across Pretty Link Pro years ago and paid for the plugin out of my own pocket. Pretty Link Pro has an affiliate program that I signed up for once I already owned and began using the plugin. I link to the plugin using affiliate links. This means that at no extra cost to you, I may receive a commission if you purchase the plugin.)
There is also a free version of the plugin called Pretty Link Lite, but the Pro version has features I won’t do without – like being able to change the base slug in the cloaked links.
Installing Pretty Link Pro
Once you have purchased and downloaded the plugin you’ll need to install it.
- In your WordPress dashboard, head to Plugins > Add New
- At the top of the next screen, click on the Upload a Plugin button
- Choose the PLP plugin file from your computer and click Install Now
- On the next screen, click Activate Plugin
The plugin is now installed and ready for setup.
Verifying your purchase of Pretty Link Pro
In order to enable the advanced features in the plugin, you’ll want to verify your purchase of the plugin before setting things up.
- Look for a tab labeled Pretty Link in the left hand menu of your WordPress dashboard
- Mouse over the Pretty Link tab so that the submenu pops up
- Click the last link in the list labeled Pretty Link Pro
- On the next screen enter your username and password for the account you created at Pretty Link Pro when you purchased the plugin
- Click Save
- Click the Get Started link at the top of the resulting screen
Once you’ve verified your purchase, and click the Get Started link, you’ll notice a message at the top of the screen in the Pretty Link admin section saying a database upgrade is required. Click the Automatically upgrade your database link and the plugin will perform the update for you.
Setting up the options in Pretty Link Pro
Pretty Link Pro has a ton of features, but I’m going to keep things simple and walk you through the core options I setup when I install it so that you can get started without being overwhelmed with all the additional features you may or may not want to use. Think of this as a quick start guide.
Setting up the Basic Options
Click on the Options link under the Pretty Link navigation pane in the left menu of your WordPress dashboard. On this page, you’ll see three expandable options: Link Options, PrettyBar Options, and Reporting Options. We’re going to expand and focus on the Link Options and Reporting Options in this section.
Link Options
Click on the [+] symbol next to the Link Options section to expand it.
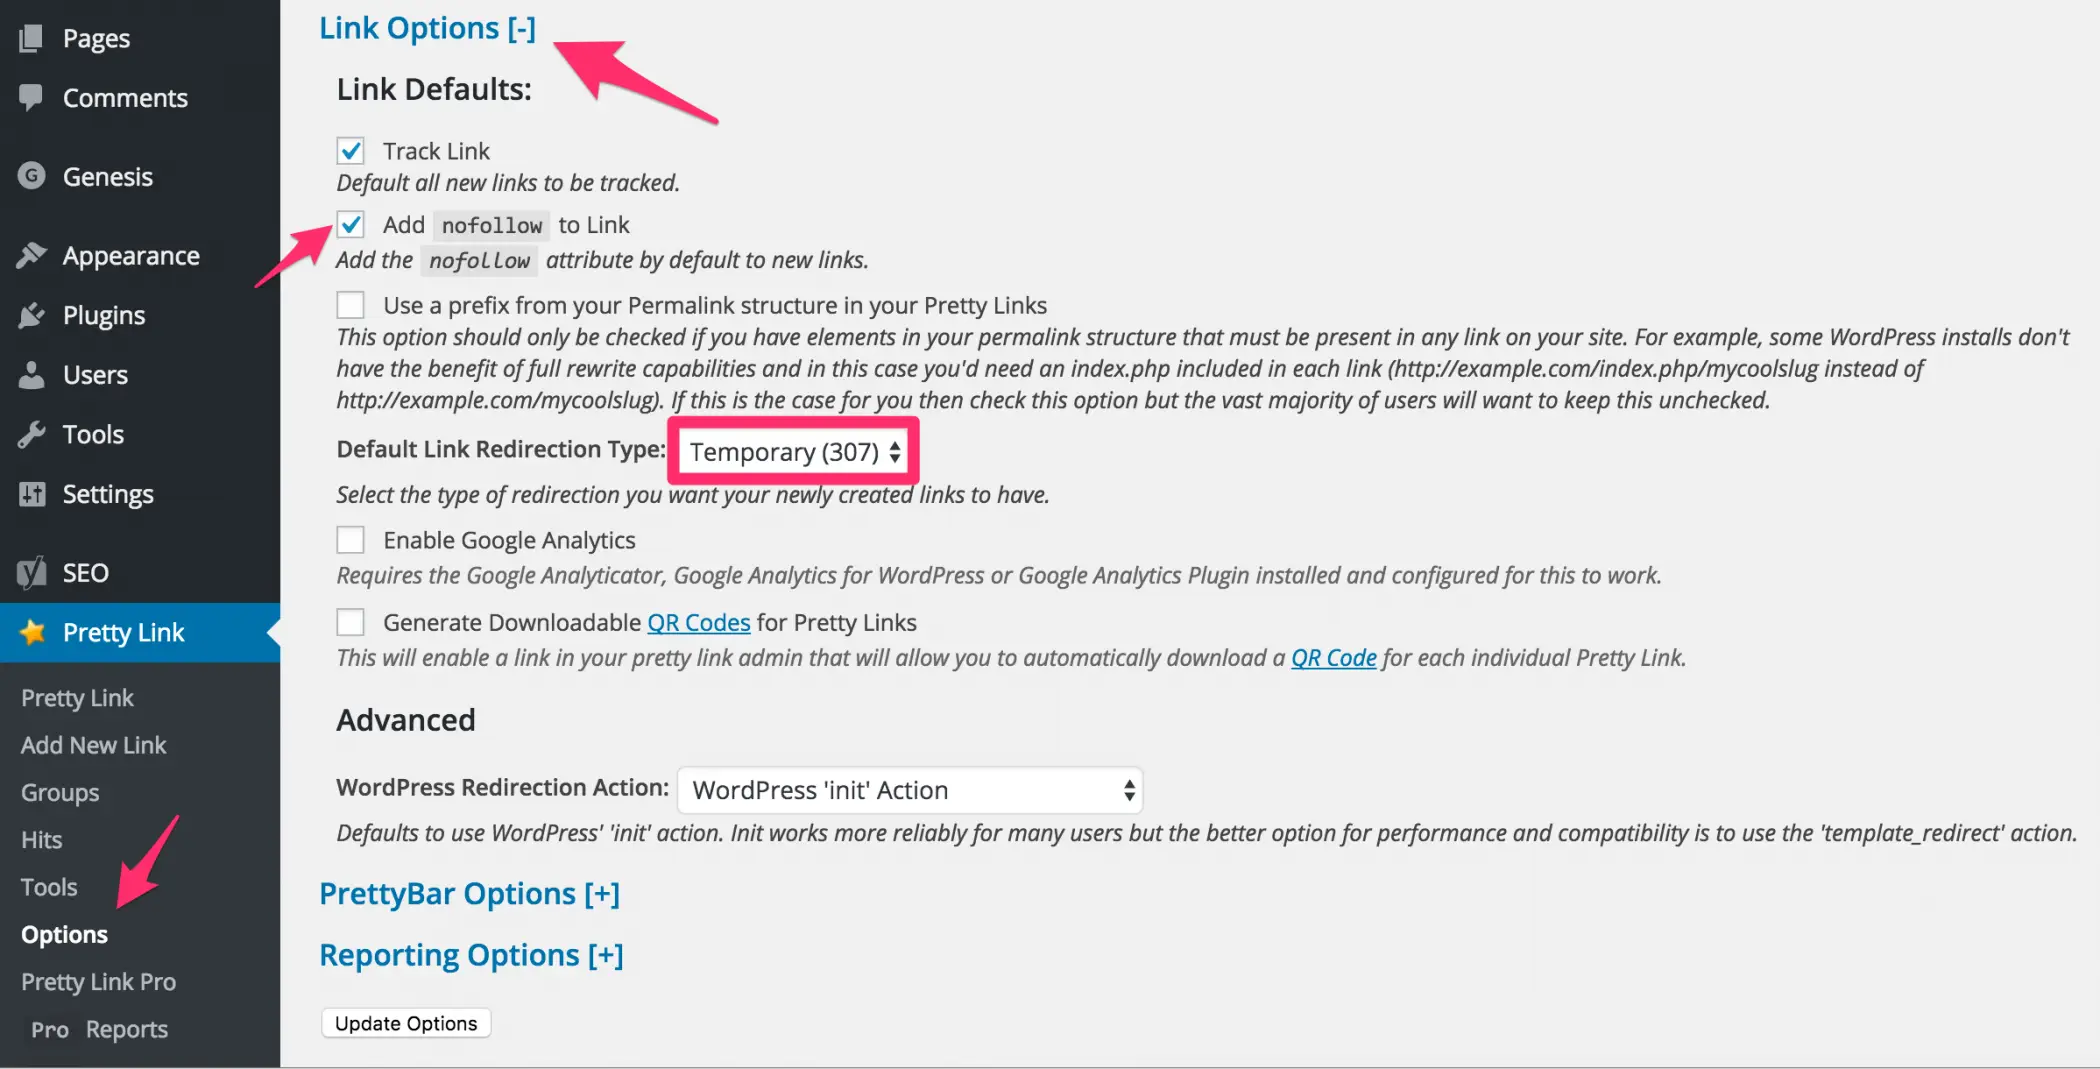
- Track Link will be checked by default and should remain that way
- I also check off the nofollow option so that all of my cloaked links are nofollowed by default
- The Default Link Redirection Type will default to a 307 Temporary Redirect and I leave it that way
- Once everything matches the screenshots above, click Update Options at the bottom of the screen
Reporting Options
Once you’ve set up the basic Link Options, you’ll want to expand the Reporting Options section.
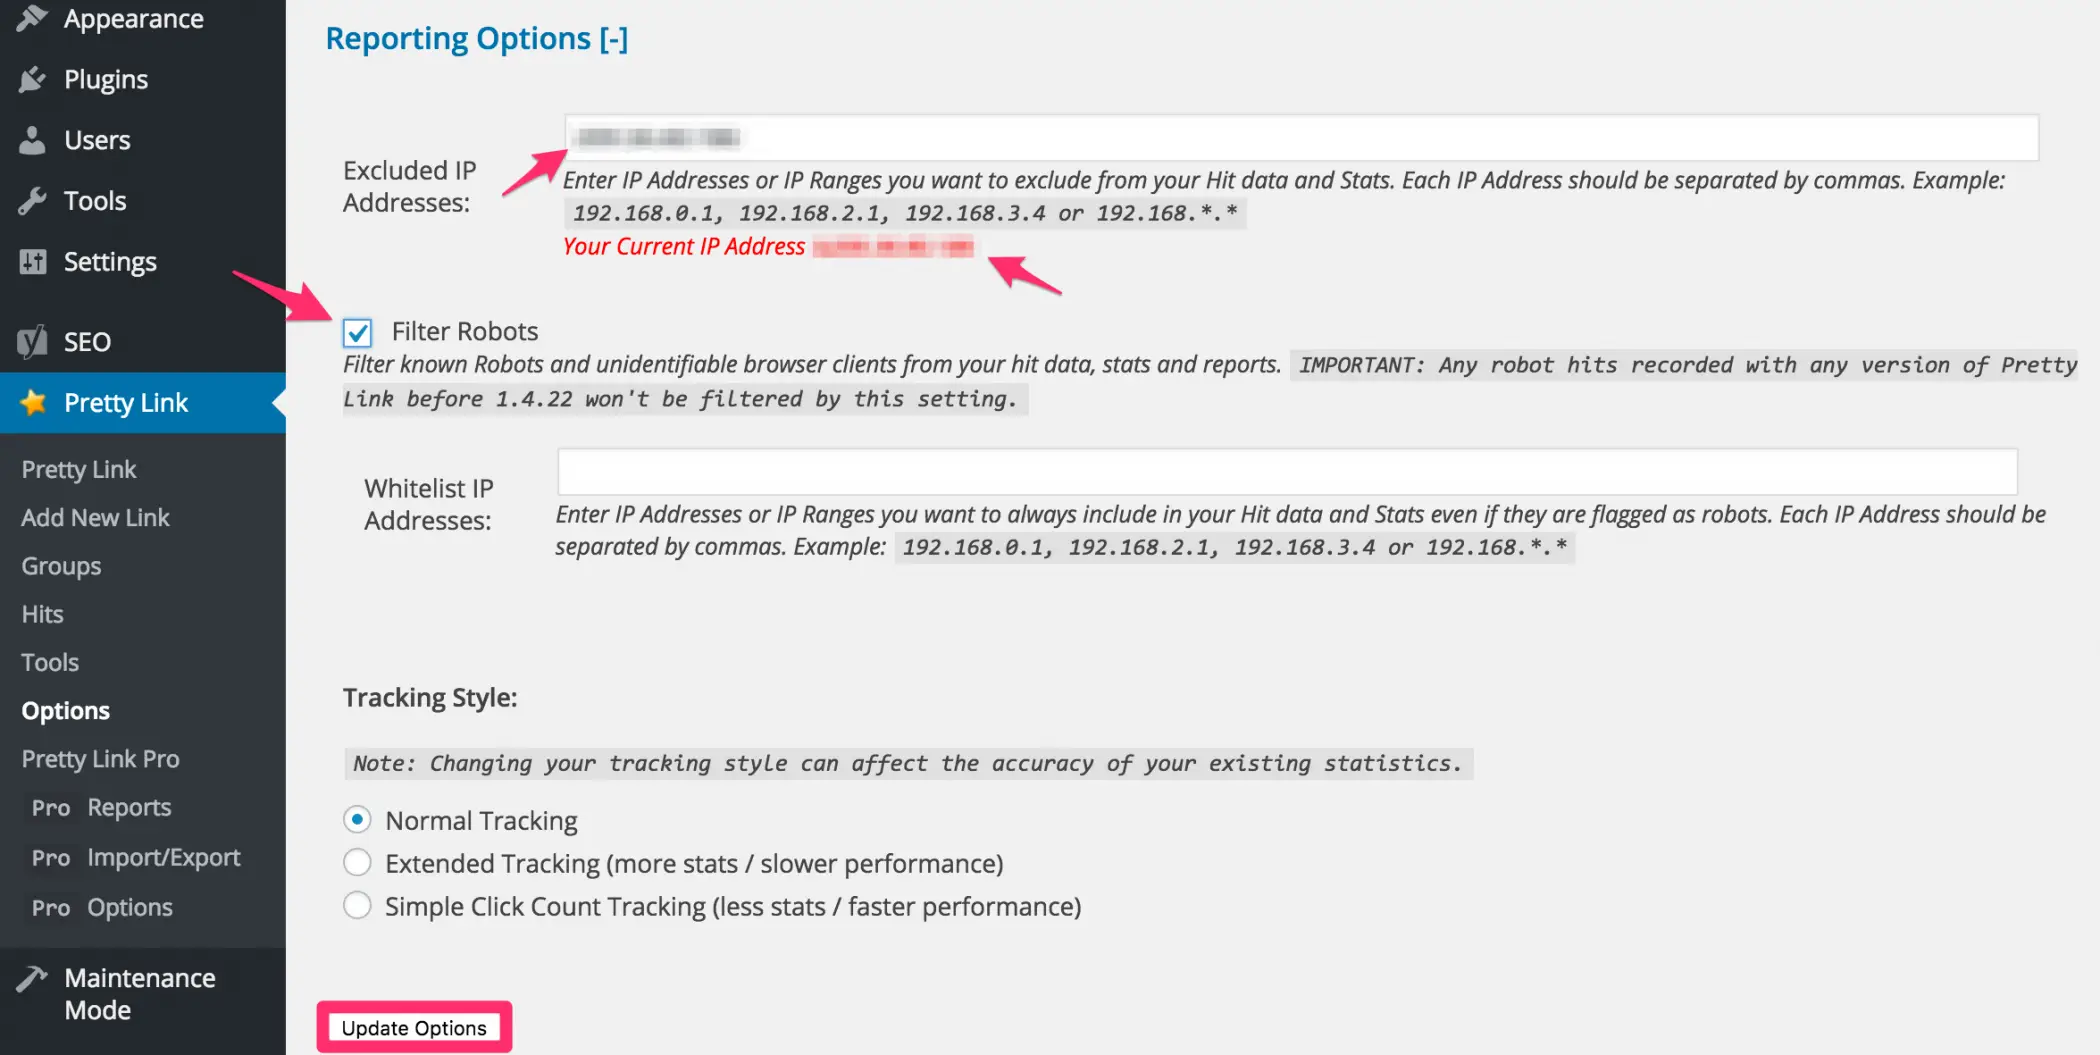
- I exclude my IP address so that Pretty Link doesn’t include my clicks on any Pretty Links in reporting
- The plugin tells you what your IP address is, so you can copy and paste it into the IP field above
- I also check off the option to exclude known robots
- Normal Tracking will be checked by default and I leave it that way
- Once everything matches the screenshots above, click Update Options at the bottom of the screen
Note: If you’re using a plugin like Broken Link Checker to crawl links on your site, you’re going to end up with skewed click reporting because Pretty Link will track the clicks from the plugin and include them in the reporting. So if you’re using that plugin – or one like it – you’ll want to exclude your website’s IP address in the Excluded IP Addresses field. You can find the IP address of your website here.
Setting up the Pro Options
Once you have the basic options set up, you can navigate to the Pro Options under the Pretty Link navigation pane in the left menu of your WordPress dashboard. On the next screen, you’ll see six expandable options: Keyword & URL Replacement Options, Page and Post Options, Twitter Options, Social Network Options, Public Link Creation Options, and Global Options.
Once again, we’re going to keep things simple and focus on the Keyword & URL Replacement Options and Global Options.
Keyword & URL Replacement Options
What this section does: Whenever you create a Pretty Link, you can define keywords or phrases that should be assigned to it so that Pretty Link links instances of that word or phrase to your Pretty Link for that affiliate program automatically.
Using the automated keyword and URL replacement options opens you up to the risk that you may have undisclosed affiliate links on your site. To ensure compliance with the FTC disclosure guidelines for affiliate links, I prefer to hard code the Pretty Link affiliate links like I would a regular link. This way I can ensure that I ensure I have disclosure clearly stated within any content that has an affiliate link.
Because of that, I disable this option by unchecking the box next to Keywords and URL Pretty Link Automatic Replacement and clicking Save.
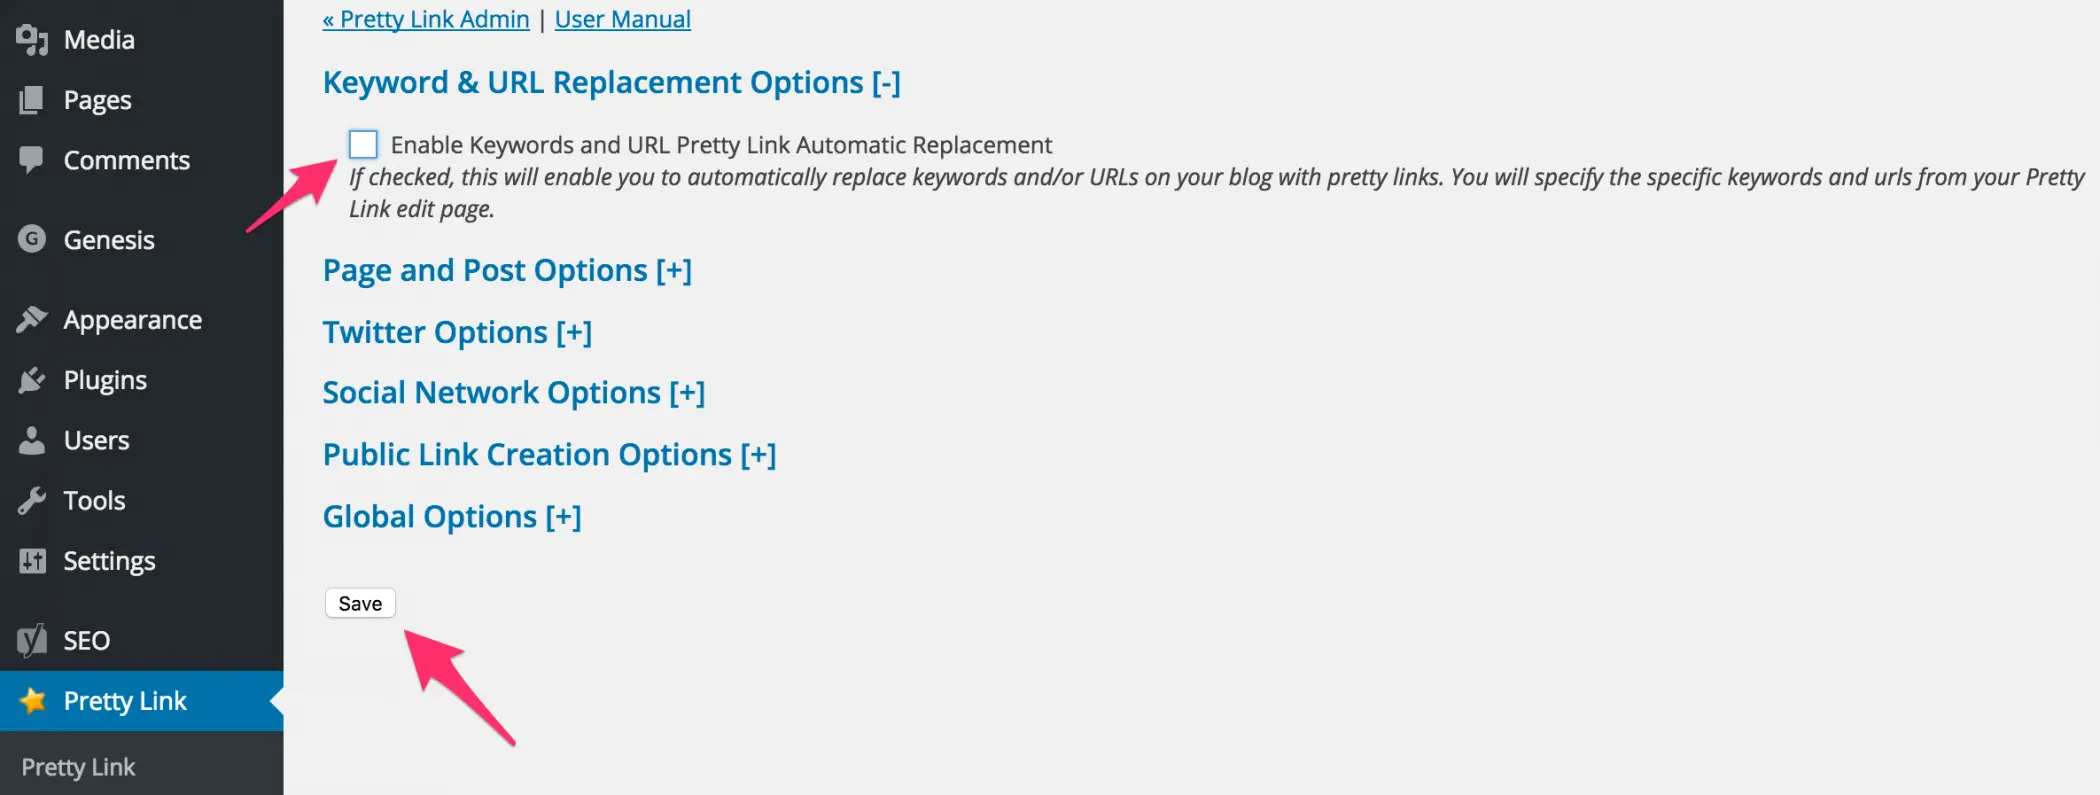
It was a feature I used before the launch of the FTC guidelines, but I prefer to err on the side of caution and not risk getting sued for failure to disclose.
Global Options
This section allows you to change out the base URL for your Pretty Links. By default, your Pretty Link would look like this:
http://yourdomain.com/myprettylink
However, I prefer to keep all of my Pretty Links in a subfolder so that I can easily prevent Google from crawling them (we’ll cover that further down in the post).
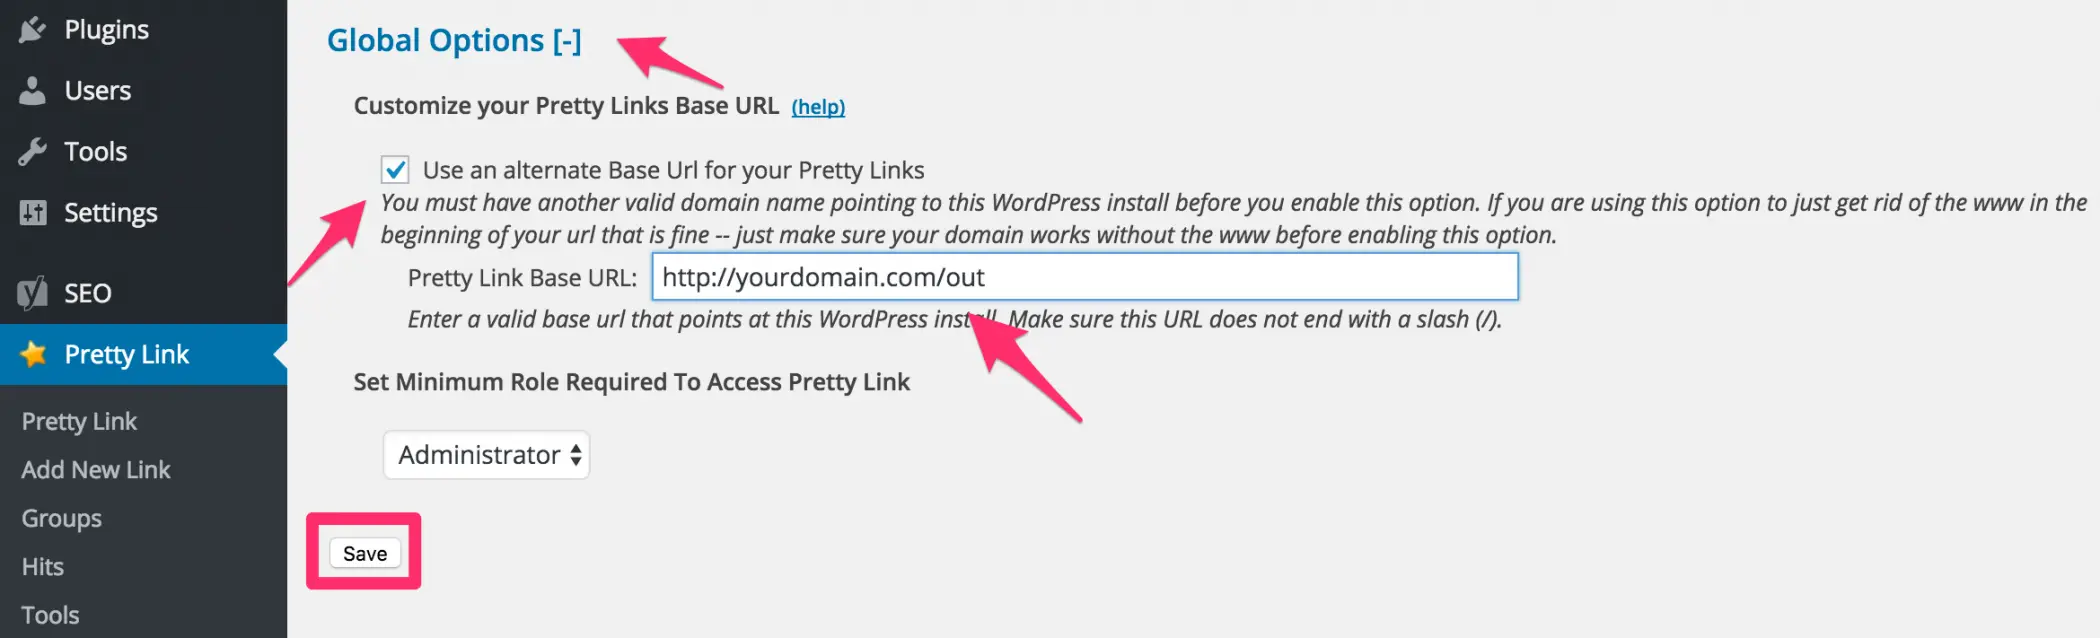
- I check off the box next to Use an alternate Base Url for your Pretty Links
- I add the Pretty Link Base URL into the field that appears when I check the box
- Set Minimum Role Required To Access Pretty Link is set to administrator by default and I leave it that way
- Once everything matches the screenshots above – with your personal URL in place of the URL in the screenshot – click Save at the bottom of the screen
You can make the base URL whatever you’d like it to be, but be sure not to add a trailing slash to the end of the URL. Some common base URLs people use include out, go, goto, link, etc.
Once again, Pretty Link has a ton of features I didn’t cover within this post, but the above are the essential features I setup for every site. You can poke around with the more advanced features as you become more comfortable with the plugin.
Preventing Google from crawling your Pretty Links
Once you have a custom subfolder setup to handle your Pretty Links, you’ll want to prevent Google from accessing that folder by using a disallow directive in my robots.txt file. Search engines don’t want to waste resources crawling your redirects, and I’d prefer they stay away from my affiliate links anyway, so they don’t see tons of redirected links on my site.
If you’re using the WordPress SEO Plugin by Yoast, this is easy to do. From your WordPress dashboard, go to SEO in the left-hand sidebar and choose Tools > File Editor.
If you don’t already have a robots.txt file, this screen will give you the option to have the WordPress SEO Plugin create one for you. Once you have a robots.txt file, add the following directive to it – replacing /out/ with whatever you used in your base URL in the Global Options section above:
User-agent: *
Disallow: /out/
Then click the Save changes to Robots.txt button below the box.
If you’re not using the WordPress SEO Plugin, you’ll find instructions for creating and editing a robots.txt file here.
Creating Pretty Links
Now that you have the plugin basics setup, you’re ready to start creating some cloaked links. Click on Add New Link under the Pretty Link menu in the left side navigation of your WordPress dashboard.
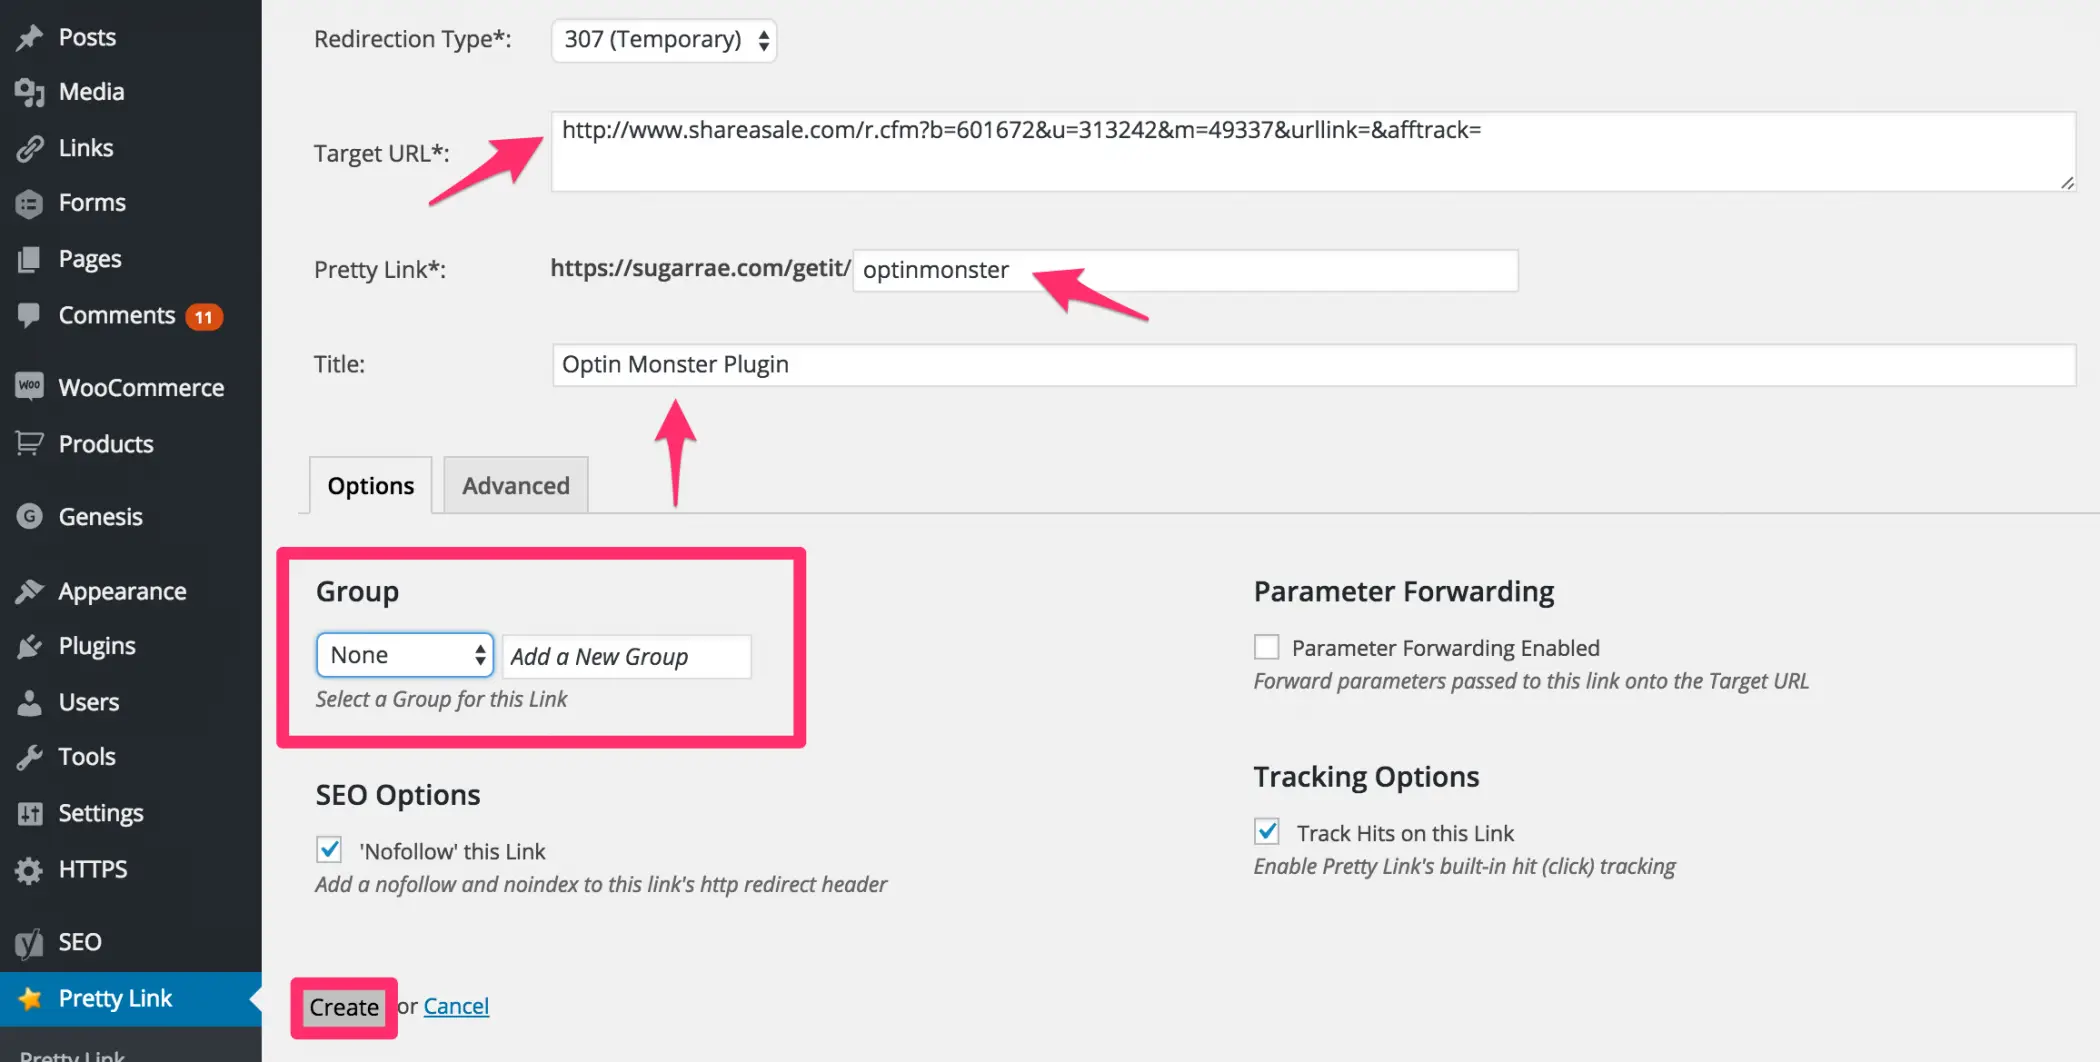
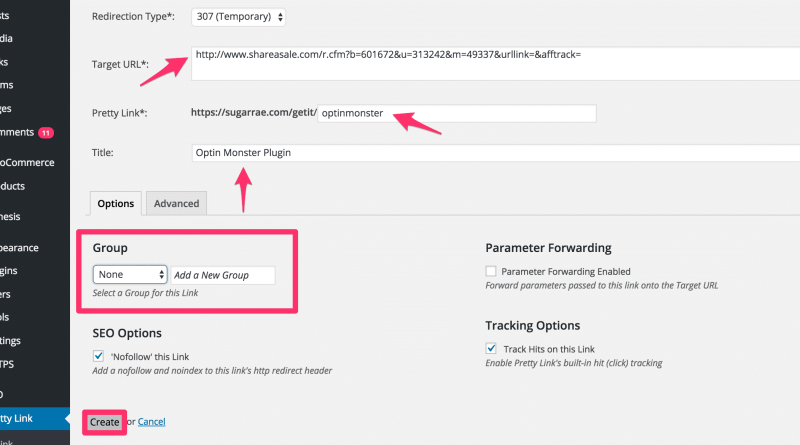
- The Redirection Type will automatically be set to a 307 because we set that up as the default in our basic options
- ‘Nofollow’ this Link and Track Hits on this Link will also be checked for the same reason
- In the Target URL, you’ll put your standard affiliate link for the program
- The Pretty Link box will contain a random string by default that you can change to be whatever you like
- The Title for the link is for backend purposes, so you will know what program or product each Pretty Link is for
- Choose a Group to assign the link to if applicable – see below Groups section
- Click the Create button at the bottom of the screen
You’ll note that the Parameter Forwarding Enabled option is unchecked and is left that way. Pretty Link says that parameter forwarding is a feature meant for developers looking to pass dynamic (changing) parameters into the target URL based on some action the user completed. That’s not me, and that’s probably not you.
You may have also noticed the Advanced tab – and that we didn’t do anything with it. The Advanced tab is where you can assign a double redirect, assign keywords to a link if you left that feature turned on, and setup split tests – none of which are features I need or use.
Pretty Link Groups
The Group feature allows you to put links into specific groups to categorize them. Whether or not you use this feature will be a personal preference. I group some links, but not others. However, one thing I should note is that the Add a New Group function has never worked for me from the Add New Link screen. If I want to assign a link to a group, I need to go to the Groups section in the Pretty Link menu to create the Group if it doesn’t already exist, before creating the first link I plan to place in it.
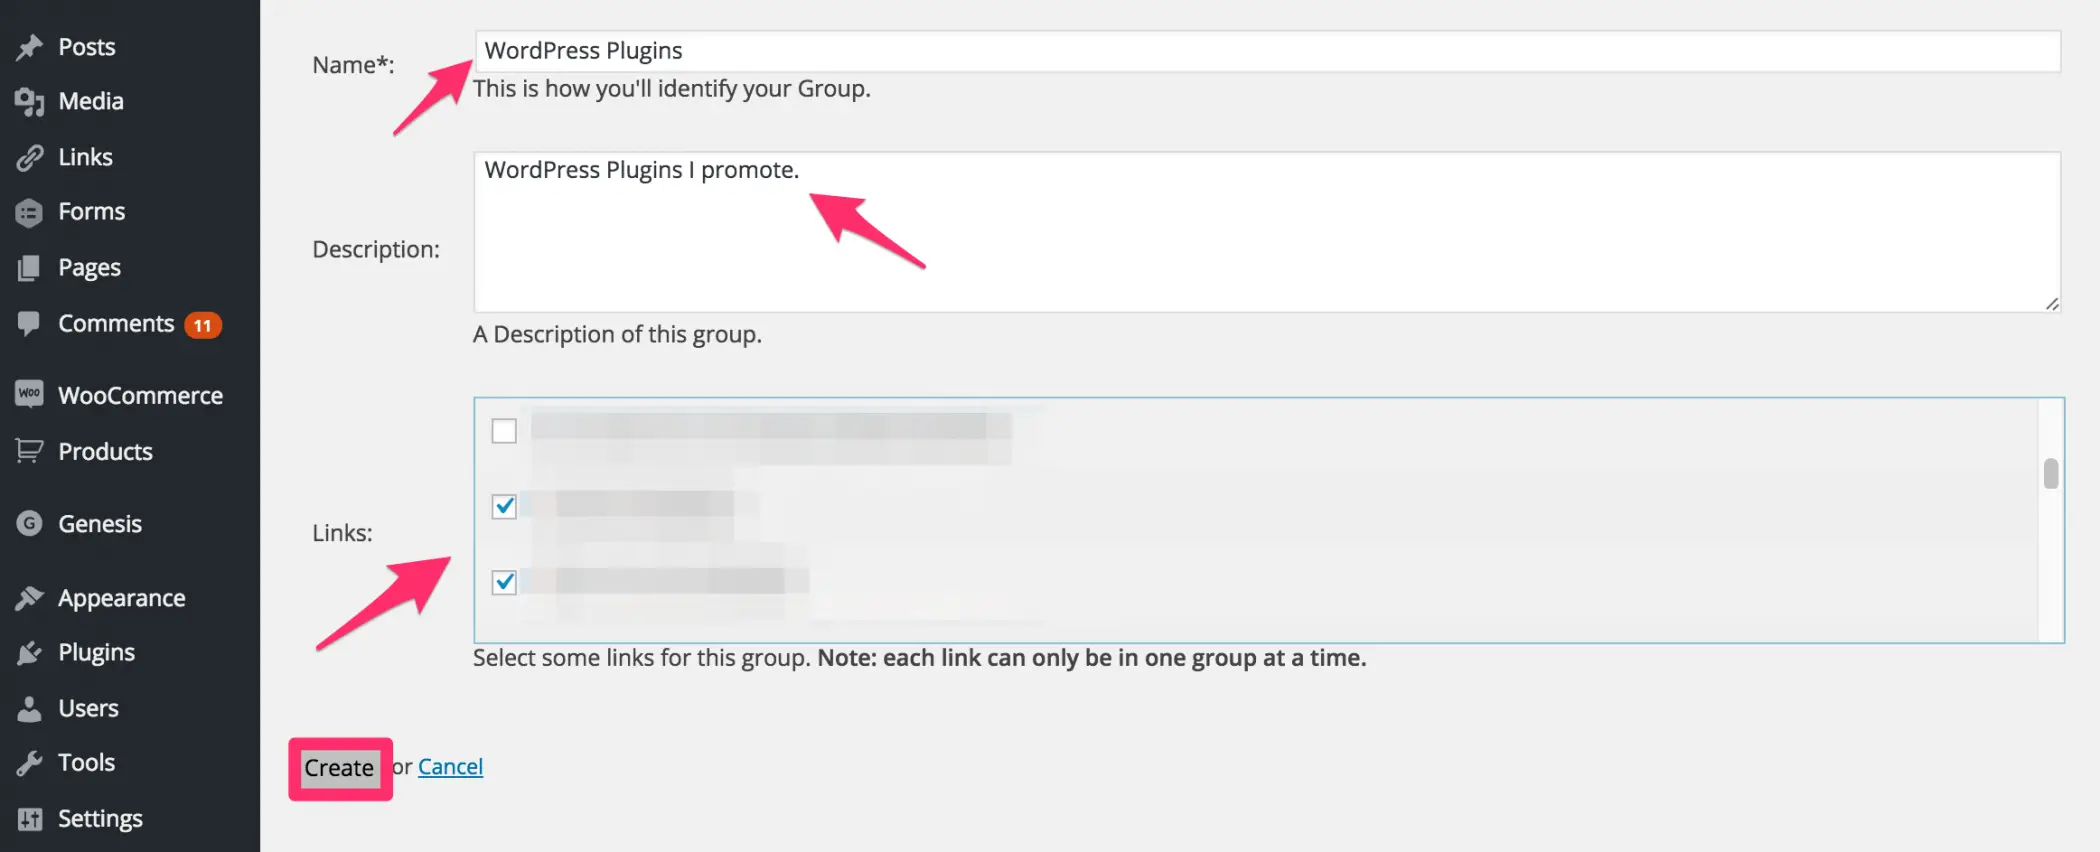
- Click Add a Pretty Link Group on the main Groups page found in the Pretty Link submenu
- Name your Group
- Give your Group a description if you’d like
- If you have preexisting Pretty Links you’d like to add to the Group, you can check them off to do so
- Click the Create button at the bottom of the screen
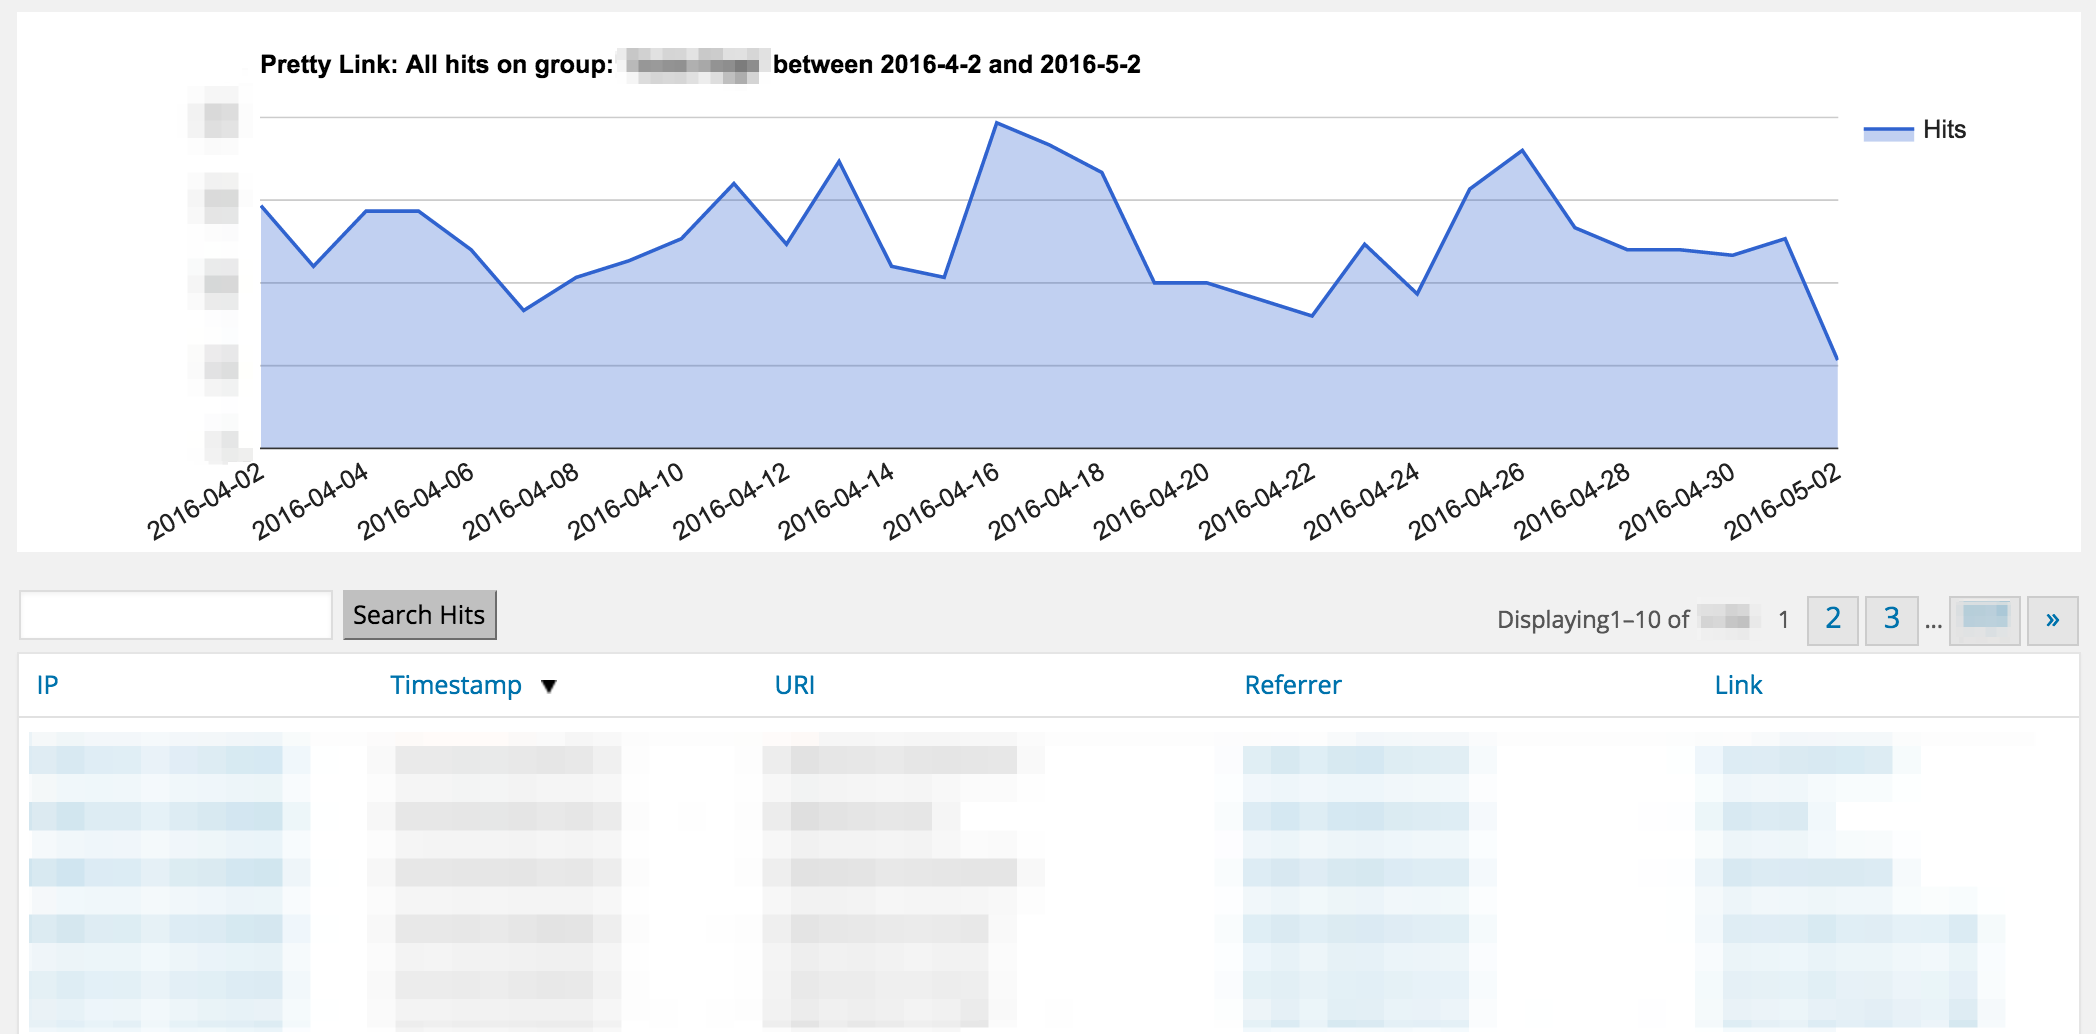
Segmented Groups Reporting
Pretty Links tracks clicks for all links, but if you have Groups set up, you can also see tracked clicks for links within a single group only. Mouse over the Group name on the main Groups screen and you’ll see some options appear. If you click the Hits link, it will show you the click tracking report limited to links within that Group.
Using Groups in Tandem with SID Tracking
Groups can be particularly useful for tracking how many clicks a particular page is generating – such as Start Here or Tools I Use style pages. For instance, I have a Group set up for my Toolbox page here on Sugarrae. The Pretty Links on that page are assigned to the Tools Group. Each of those links created within the Tools Group also contains SID tracking specific to the Toolbox page. I don’t use those same links anywhere but the Toolbox page.
Using a group for the Toolbox page allows me to see how many clicks the page is generating and – using the SID tracking in tandem with that – allows me to compare click reports on my end with those reported on the merchant’s end. It also helps me to track how many sales that page is generating because those links contain SID tracking other links to the same merchant do not (when the merchant program has SID tracking available).
General Pretty Link reporting
I mentioned segmenting Group reporting above, but you can find the standard reporting for all links by clicking the Hits link in the Pretty Link submenu from the WordPress dashboard.